
How to Make Peanut Butter Spider Cookies
Last updated on October 2nd, 2025 at 09:56 pm
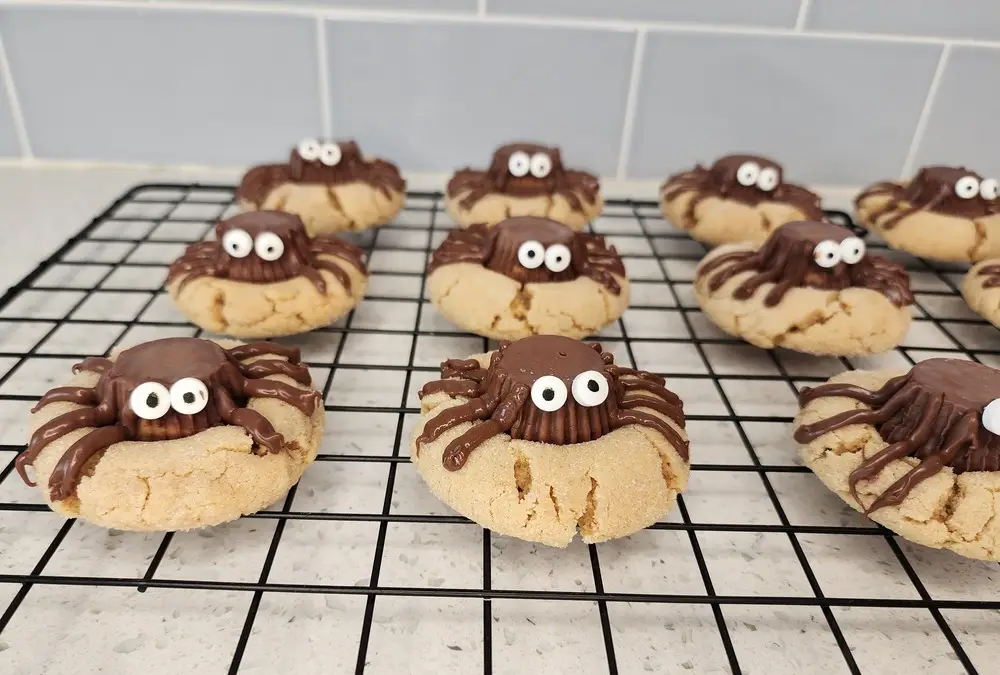
If you’re looking for a Halloween cookie that’s both adorable and easy to make, these peanut butter spider cookies check every box. They start with a soft peanut butter blossom cookie, then get topped with a mini Reese’s cup and candy eyes to create the sweetest little chocolate spiders.
This recipe is one of my favorites in October because it uses simple pantry ingredients, comes together quickly, and the decorating is easy enough for kids to help with. Whether you need a Halloween dessert for a classroom party, a bake sale, or just something fun for family movie night, these cookies rarely last 24 hours after baking.
Peanut butter spider cookies are the kind of Halloween treat that feels special without adding stress, and they’re sure to be remembered long after the last candy wrapper is thrown away.

Disclaimer: This post may contain affiliate links. If purchases are made through these links, I may receive a small commission at no additional cost to you. Thank you for supporting this site.
My Favorite Kitchen Tools for Spider Cookies
- Cookie Scoop: Keeps the dough even so all the cookies bake the same size, plus it’s less messy than spoons.
- Baking Mats: I love these silicone mats because they prevent over-browning on the bottoms and make cleanup so easy.
- Three-Tier Cooling Rack: This is a lifesaver when you’re baking multiple batches. It saves counter space, lets the cookies cool evenly, and keeps little hands from sneaking them too soon.
- Piping Bags: Perfect for piping on chocolate legs. A sandwich bag with the corner cut can also work too.


How To Make Peanut Butter Spider Cookies
Before Making Your Cookies
Unwrap 24 mini Reese’s and place them in the freezer. Freezing them prior to placing them on the cookies helps them keep their shape as the warm cookie melts the chocolate. Only unwrap the outer foil but leave the paper on. This helps keep all the chocolate and peanut butter on the candy for a more uniform look.
Make the Dough
Start by creaming together softened butter, white sugar, and brown sugar until light and fluffy with a stand or hand mixer. This will take about 2-3 minutes. Mix in the vanilla extract and creamy peanut butter, then add the egg and mix until it’s fully combined.
In a separate bowl, whisk together flour, baking soda, and salt, then gently mix it into the wet ingredients. Make sure not to over mix. Chill the dough in the fridge for about 30 minutes so it’s easier to handle.
Shape the Cookies
Scoop about 1 ½ tablespoons of dough, roll each scoop into a ball, then coat lightly in white sugar. Using a cookie scoop help keep the cookies all the same size. Place the dough balls on a baking sheet lined with parchment or a baking mat about 2-3 inches apart leaving room for spreading.
Bake the Cookies
Bake at 350°F for 9–11 minutes. The cookies should be starting to brown around the edges and the dough cracking. As soon as they come out of the oven, gently press a frozen mini Reese’s (or other round chocolate candy) sideways into the center of each cookie to form the spider body.
Leave the cookies on the baking sheet to cool for at least 15-20 minutes before transferring to the cooling rack until completely cooled. If you move the cookies to early the Reese’s can lose it’s shape.
Decorate the Spiders
Once the cookies are cool, melt the chocolate chips in the microwave at 50% power for 2-3 minutes, stirring every 45 seconds. Transfer the melted chocolate into a piping bag or a sandwich bag with the corner snipped off.
Pipe on eight little legs around each chocolate candy. For the eyes, add a tiny dot of melted chocolate on the back of each candy eye and press them onto the spider body.
That’s it! You’ll have a tray of adorable spider cookies ready for Halloween parties, bake sales, or just a fun baking project at home.
Tips for Making Spider Cookies with Kids
As a toddler mom, I know patience can run thin when your little ones are helping in the kitchen. While they may not always work, here are a few of my tips and tricks to have the whole experience be smoother for everyone:
- Bake the cookies ahead of time, then let kids decorate once they’re cooled.
- Set up a decorating station with all the toppings in little bowls. And you don’t have to stick to our recommendations for decorating. Extra sprinkles or colors only add to the fun.
- Don’t worry about perfect spiders, sometimes the unique ones end up fitting the spooky vibe better anyways.
Variations and Substitutions
Peanut-Free Option
If you need to skip the peanut butter, try making these spiders with a chocolate chip or sugar cookie base. They hold up well and taste just as good.
Candy Choices
Mini Reese’s are my favorite for the spider body, but Rolos or other round chocolates work too. Candy-coated chocolates are another fun choice if you want something colorful and a little different.
Extra Color
For a pop of Halloween flair, you can roll the cookie dough in colored sugar before baking or top the finished spiders with seasonal sprinkles. Both are simple ways to add extra color without much effort.
Make Ahead and Storage
Room Temperature: Once decorated, these cookies will stay fresh in an airtight container at room temperature for up to five days.
Freezing: You can bake the cookies ahead and freeze them undecorated in a freezer-safe container for up to three months. When you’re ready to serve, let them thaw and then add the candy eyes and chocolate legs so they look freshly made.
Make Ahead: If you’d rather prep the dough in advance, it can be kept in the fridge for up to two days before baking. Decorate just before serving so the spiders look their best.

FAQ for Peanut Butter Spider Cookies
Can I freeze spider cookies?
Yes. For best results, freeze the baked cookies undecorated in a freezer-safe container for up to three months. Add the candy eyes chocolate legs after thawing so they look fresh and nothing cracks or crumbles.
What if I don’t have candy eyes?
Mini chocolate chips make an easy substitute. You can also use a small dot of white chocolate with a smaller dot of dark chocolate in the center to create a homemade version.
Do I have to use homemade dough?
Not at all. Store-bought peanut butter cookie dough works perfectly and saves time if you’re baking for a classroom party or busy weeknight.
What kind of peanut butter works best?
Stick with regular creamy peanut butter for this recipe. Natural peanut butter separates too much and will make the dough greasy and hard to work with.

Peanut Butter Spider Cookies
Equipment
- Mixing Bowl
- Cookie Scoop
- Silicone Baking Mat
- Mixing Bowl
- KitchenAid 9-Speed Mixer
Ingredients
- 1/2 cup unsalted butter Room temperature
- 1/2 cup brown sugar Packed
- 1/2 cup granulated sugar
- 3/4 cup creamy peanut butter
- 1 large egg
- 1 1/2 tsp vanilla extract
- 1 1/2 cups all purpose flour
- 1 tsp baking soda
- 1/2 tsp baking powder
- 1/2 tsp salt
- Granulated sugar for rolling the cookies
- Mini Reese's Peanut Butter Cups
- 3/4 cup chocolate chips for melting
- Candy eyes
Instructions
- Unrap around 24 mini reese's cup candies and place in the freezer for at least 2 hours prior to baking. This will help them hold their shape once placed on the hot cookies.
- Preheat oven to 350°F
- In a mixing bowl, combine the butter, sugar, and brown sugar. Beat with an electric mixer or in a stand mixer for 2-3 minutes until fully creamed.
- Add in the peanut butter, egg, and vanilla extract, and beat again until combined.
- In a separate bowl, whisk together the flour, baking soda, baking powder, and salt.
- Add the flour mixture into the mixing bowl and mix on low or with a spatula until just combined. Do not overmix
- Using a small cookie scoop form balls about 1 1/2 tablespoon from the dough. Roll the dough between you hands to get a uniform ball, then roll in a bowl of granulated sugar. Place the balls 2-3 inches apart on a silicone lined baking sheet and bake for 9-11 minutes or until the edges of the cookies start to brown and crack.
- Remove the cookies from the oven and immediately place a frozen mini Reese's cup into the center of each cookie, pressing down lightly. Allow the cookies to cool for 15-20 minutes before moving to a cooling rack.
- Place chocolate chips in a microwave safe bowl. On 50% power, microwave for 2-3 minutes stirring the chocolate every 45 seconds to prevent burning. When fully melted transfer to a piping bag or plastic sandwich bag with the corn cut off.
- Draw 4 legs on each side of the cookies. Place a small dot of melted chocolate on the mini Reese's and place 2 eyes on the spider cookies. Allow the chocolate to fully set before arranging on a serving platter.